 |
| Delicious Gringa Relleno |
 |
| Yuck = Typical Spongey Relleno |
So here's how you make the best dang chile relleno on the planet:
http://www.newmexicocatalog.com/html/fresh_green_chile.html

3. Depending on how rustic you want your rellenos to be, you can choose either to remove or leave the stems and seeds intact. In my family, we keep them rustic, so that's what you'll see pictured. If you choose to keep them this way, make sure you let your lucky guests know not to eat the stem and seeds. It's all part of the wonderful culinary experience.

Ingredients:
Vegetable or Canola Oil
2 medium eggs, beaten
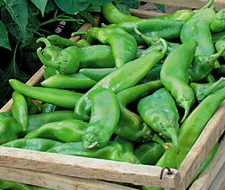
8 roasted New Mexican Green Chile Peppers
1 sleeve of saltine crackers (preferably with salt)
8 thick slices of your favorite cheese (Cheddar is better, in my opinion)
5. Crack your eggs in a wide shallow bowl, the width of the peppers, and beat with a fork until well blended. Set aside.
6. Remove the crackers from the sleeve of saltines and place inside a larger zip loc bag. Make sure there is no air remaining inside after sealed. Take that bag of crackers and beat it up. Punch it or use a rolling pin or whatever you have to make those crackers turn into crumbs. You don't want them to turn into cracker dust, just small enough that they will adhere to the chiles and make a nice even crust when frying. Pour the crumbs into a separate wide shallow bowl, the width of the peppers, and set aside.
7. Take your chile peppers and make a slit vertically in the long direction of stem to pointy end. Place your slice of cheese inside, and close up the hole with your fingers. I like to use really thick chunks, as wide as the pepper and about 2/3 as long as the pepper, and let the cheese ooze out when frying. Usually some of the cheese fries up and it adds an extra special touch of flavor and texture.
8. Get your favorite frying pan out and fill with about a 1/2 an inch of oil on the bottom and turn to medium heat. Ideally you would use a pan that can fit all 8 peppers at once, but a smaller pan is fine, too. You'll know that the oil is ready to go after a few minutes when you throw in a crumb or two and hear it sizzle. Please be careful, as you are working with hot oil here, but I'm making sure to instruct you to only use a shallow layer of oil so that it most likely won't jump out at you. An apron is recommended and if you have kids in the house, put the pan on the backburner. This is a good time to grab a plate with some paper towels on it. You'll use it to let the fried peppers cool off on after frying, and to let some of the excess oil drain off.
9. While the oil is heating up, set up your assembly line: peppers, eggs, crumbs.
10. Pick up your cheese filled pepper in such a way that the cheese won't pop out and carefully place it in the egg bowl. Use a fork, spoon or your hands to evenly coat the chile pepper with egg. The egg is the glue that makes this recipe a success or failure, so make sure you really get it covered.


11. Place your eggy pepper in the bowl of crumbs and use a fork, spoon or your hands to evenly coat with cracker. This is your crust and if isn't sticking, then it needs more egg.


12. You can either pre-assemble all 8 peppers at once and set aside on a plate, or you can make one first as an experiment and see what happens in the frying pan. Take a pair of tongues and slowly place the battered pepper in the oil. It should sizzle immediately. The bottom side should fry up in a couple of minutes and you want it to be a nice golden brown. Undercooked batter will be doughy and wet, and you definitely don't want to over fry them either. So keep an eye out for what's happening on the underside. When it looks golden brown , flip it over and repeat on the other side. Place all golden brown rellenos on the paper towel plate and use your tong to scoop out any remaining cheese or crumbs and sprinkle on top the removed rellenos.


If you are going to be reusing the oil for another batch, make sure there is no residual food floating around in it as it will start to burn and ruin the flavor of your next batch, and most likely stink up your kitchen.
13. Congratulations! You've just made the most delicious things in the world. Remove from paper towel and serve as a side dish, or even in burritos. Warm in the oven if needed until served, and enjoy!

Great pics. I will try your recipe. My friend went to Mexico and the chef there dipped in egg wash that had been whipped to a meringue consistency. No yolk. Are you familiar with that method?
ReplyDeleteBar in mission The bottom side should fry up in a couple of minutes and you want it to be a nice golden brown.
ReplyDelete